Sunday, 17 June 2012
Tuesday, 12 June 2012
Add Find Us On Facebook Tab To Blogger
Hello Friends,Today I'll teach "How to add FIND US ON FACEBOOK TAB to Blogger".
Well,Many
people here visit my blog daily and request me to Post some Blogger Tips
on my blog too.So I have started posting Blogger tips on my Blog.
1.)Well,First of All,To add the FIND US ON FACEBOOK TAB, go to this Link- Click Here
Now the following page will Open.

Click the Photo to Enlarge.
2.)Select the choices appropriately and you can see a live preview of the Like/Fan box.
3.)Once you are satisfied with the looks of the Like Box, Click on the “Get Code” button.
4.)Copy the xfbml code which gets generated.

Click the Photo to Enlarge.

Click the Photo to Enlarge.
5.)Now login to your Blogger account and go to Design > Page Elements
6.)Click Add a Gadget Link and Add an HTML/JavaScript Gadget.
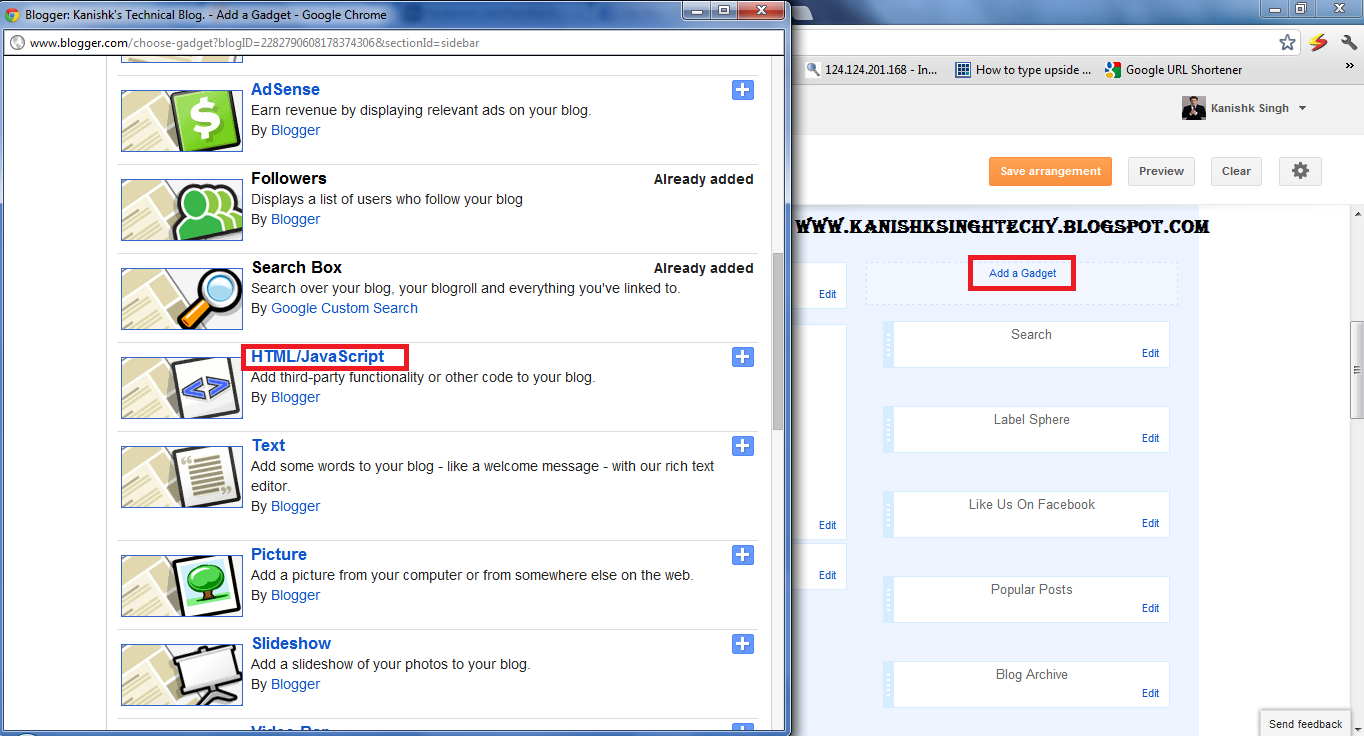
Click the Photo to Enlarge.
7.)Paste the generated code as the Gadget’s Content.

Click the Photo to Enlarge.
8.)Now Save the Gadget.

Click the Photo to Enlarge.
Now,Save the Arrangments and then View your Blog,your FACEBOOK FAB BOX would be Ready!
Friday, 8 June 2012
How To Recover Your Disabled Facebook Account?
In today's trend, everyone is addicted to Facebook. Sometimes users account got disable because of some violations. There may be many reasons why your Facebook account can be disable. If you think your account get disabled in mistake or you have not violate any Facebook's Statement of Rights and Responsibilities, you can request facebook for recovering your account back. Follow these steps:
Go to this link: My Personal Profile was Disabled
Fill the form with accurate information.
Submit it.
You can also send request to Facebook of your disabled account by sending Email at disabled@facebook.com with accurate information including Name, Email Address, Date of birth & reason if you know.
For more information check this facebook help form: Help Center
Hide Online Chat Status In New Facebook Chat Bar From Any Particular Friend
 Sometimes it happens when you don't wish to chat with a friend because of some issues, but want to stay online for all other friends. In this post, I'm gonna tell about hiding online chat status from any particular friend in new facebook chat bar, follow these simple steps:
In Facebook chat bar, click on Options and go to Advanced Settings...
Under Advanced Chat Settings:
Under "All your friends see you except...", Enter name of friends to whom you want to show offline (you can also include lists if you've made).

Click on Save.
That's all.
Note: If you wish to show online to only few friends, add them in second option "Only some friends see you...".
How To Include Auto Read More In Blogger?
Including read more feature below posts gives professional look to your blog. As you can easily include read more in blogger by inserting jump break, but you would have to manually add it every time whenever you publish any post. So better is to make settings for auto read more option as it saves your time and also prevents from being confused about where to insert it at proper position in body content. Follow these simple steps:
Login to Blogger.
Go to Design> Edit HTML
Backup your template.
Check the Expand Widget Templates.
Look for </head> by pressing Ctrl+F
Add the following code after </head>
<!--http://www.sirajuddin47.blogspot.com-->
<script type='text/javascript'>
var thumbnail_mode ="yes";
summary_noimg = 430;
summary_img = 340;
img_thumb_height = 200;
img_thumb_width = 200;
</script>
<script type='text/javascript'>
//<![CDATA[
function removeHtmlTag(strx,chop){
if(strx.indexOf("<")!=-1)
{
var s = strx.split("<");
for(var i=0;i<s.length;i++){
if(s[i].indexOf(">")!=-1){
s[i] = s[i].substring(s[i].indexOf(">")+1,s[i].length);
}
}
strx = s.join("");
}
chop = (chop < strx.length-1) ? chop : strx.length-2;
while(strx.charAt(chop-1)!=' ' && strx.indexOf(' ',chop)!=-1) chop++;
strx = strx.substring(0,chop-1);
return strx+'...';
}
function createSummaryAndThumb(pID){
var div = document.getElementById(pID);
var imgtag = "";
var img = div.getElementsByTagName("img");
var summ = summary_noimg;
if(thumbnail_mode == "yes") {
if(img.length>=1) {
imgtag = '<span style="float:left; padding:0px 10px 5px 0px;"><img src="'+img[0].src+'" width="'+img_thumb_width+'px" height="'+img_thumb_height+'px"/></span>';
summ = summary_img;
}
}
var summary = imgtag + '<div>' + removeHtmlTag(div.innerHTML,summ) + '</div>';
div.innerHTML = summary;
}
//]]>
</script>
<!--http://www.sirajuddin47.blogspot.com/-->
After that, find this code: <data:post.body/>
Replace that code with following code:
<!--http://wwwsirajuddin47.blogspot.com/-->
<b:if cond='data:blog.pageType == "item"'>
<data:post.body/>
<b:else/>
<b:if cond='data:blog.pageType == "static_page"'>
<data:post.body/>
<b:else/>
<div expr:id='"summary" + data:post.id'><data:post.body/></div>
<script type='text/javascript'> createSummaryAndThumb("summary<data:post.id/>");
</script>
<a class='more' expr:href='data:post.url'>Read more » </a>
</b:if>
</b:if>
<!--http://www.sirajuddin47blogspot.com/-->
Click preview & then save it.
Max Payne 2 2003

Info:
Max Payne 2 (updated to 1.01, 2 official bonus maps for Dead Man Walking mod)
TESTED ON:
Windows 7 32bit
Intel Core2Duo E6550 2,33 GHz
2 GB RAM
nVidia 9800 GT 512 MB
Minimum System Requirements System:
1 GHz Pentium III / Athlon or 1.2GHz Celeron or Duron processor or equivalent
RAM:
256 MB
Video Memory:
32 0
Recommended System Requirements System:
1.4 GHz Athlon or 1.7 GHz Pentium 4, Celeron or Duron processor or equivalent
RAM:
512 MB
Video Memory:
64 0


DOWNLOAD LINK's
GTA 4 - single link

System Requirements
Processor: Intel Core 2 Duo 1.8Ghz, AMD Athlon X2 64 2.4Ghz
Memory: 1.5GB
Free Hard Drive Space: 16GB
Video Card: 256MB NVIDIA 7900 series / 256MB ATI X1900 series
(Intel, S3, and Mobile Versions of Video Cards are not supported)
DirectX 9 compatible Stereo Sound Card
Keyboard
Mouse


DOWNKOAD LINK
HOW TO DOWNLOAD???
1. Click on the download links
2. Wait for few seconds and then click on
Tuesday, 5 June 2012
Add Facebook Comment Box For Blogger
 In 2009 Facebook developers introduced their best social plugin called "Facebook Comments Box".
This plugin can be embedded in any website or blog and visitors can use
their IDs of Facebook, Yahoo, AOL or Hotmail to leave a comment at your
site.
In 2009 Facebook developers introduced their best social plugin called "Facebook Comments Box".
This plugin can be embedded in any website or blog and visitors can use
their IDs of Facebook, Yahoo, AOL or Hotmail to leave a comment at your
site.
Facebook comment box is one of the useful tool for bloggers to increase conversations. Now to add Facebook Comment Box to your Blogger blog follow these steps.
Step 1: Disable Default Comments
Let's
start with disabling blogger default comments because you might not
want to have 2 comments forms. Now to do this log into Blogger account and go to settings >> posts and comments
Note : if you want both comment box, don't hide.

Next to "Show Comments" field choose Hide and hit Save Settings.
Step 2. Generate your Facebook App ID
Now to get a facebook comments box in your blogger blog you should generate your own Facebook APP ID/API KEY, it’s really easy and one step process.
Log into your Facebook and go to https://developers.facebook.com/apps/
Then click + Create New App at the top right corner of the page. A new pop-up window will show up.

Enter an application name, check "I agree to the Facebook Terms" and click "Continue".
After passing a capcha you will get a new form

Fill the following info:
App Namespace: Enter anything but if you use more than one word use "-" as a seperator not space.
App Domain: You must type blogspot.com but if your using blogger custom domain you should enter your domain name.
In the end select "Website" to integrate with facebook. and enter your Blog URL and hitSave Changes.
On the next page Facebook will give you the App ID

Just copy it and paste it in a text editor like notepad, we’ll need use in the next steps.
Step 3. Codes To Add To Your Template:
You
must add the following codes to your blogger template to ensure that
the comments box will work for your blog in the right way.
xmlns attribute
Javascript SDK
Open Graph Protocol tags
Adding the xmlns attribute:
Now go to your Blogger account once again and navigate to, Template >> Edit HTML,hit Proceed and check Expand Widget Templates

Now find (CTRL+F) this in the code:
|
and at the following code at the end (before closing the > ). Put a space before it.
|
Adding the Javascript SDK Code:
Now find (CTRL+F) this in the code:
|
Add the following code just below/after it.
<div id="fb-root"></div> <script> window.fbAsyncInit = function() { FB.init({ appId : 'YOUR APP ID', status : true, cookie : true, xfbml : true }); }; (function() { var e = document.createElement('script'); e.src = document.location.protocol + '//connect.facebook.net/en_US/all.js'; e.async = true; document.getElementById('fb-root').appendChild(e); }()); </script> |
Note: don’t forget to change YOUR APP ID to your app id ( You got in Step 2).
Adding the Open Graph protocol tags:
Copy the following code
<b:if cond='data:blog.pageType == "item"'> <meta expr:content='data:blog.pageTitle' property='og:title'/> <meta expr:content='data:blog.url' property='og:url'/> <b:else/> <meta expr:content='data:blog.title' property='og:title'/> <meta expr:content='data:blog.homepageUrl' property='og:url'/> </b:if> <meta content='YOUR-BLOG-NAME' property='og:site_name'/> <meta content='LOGO-URL' property='og:image'/> <meta content='YOUR-APP-ID' property='fb:app_id'/> <meta content='FACEBOOK-PROFILE-ID' property='fb:admins'/> <meta content='article' property='og:type'/> |
and change the colored text to the following,
Change YOUR-BLOG-NAME with your Blog name.
Change LOGO-URL with your blog logo, or remove the all tag if you don’t want it.
Change YOUR-APP-ID with your application ID number ( You got in Step 2).
Change FACEBOOK-PROFILE-ID with your own Facebook user Profile ID.
After making these changes paste the above code just before/above
|
Step 4. Adding the Comments Box to your Blogger template:
Now find (CTRL+F) this in the code:
|
and paste the following code just below/after it.
<br/><br/>
<div><script src='http://connect.facebook.net/en_US/all.js#xfbml=1'/> <fb:comments migrated='1' width='450' expr:title='data:post.title' expr:href='data:post.url' expr:xid='data:post.id'/> </div> </b:if> |
Step 5.
Save the template.
Note:
For comment moderation just go to http://developers.facebook.com/tools/comments and click the settings at the rignt.

A pop up window will come up

Here you can moderate comments, add your own blacklist words or choose the standard Facebook restrictions.
Just Cause PC Game Download Free


system requirements
S.O.: windows xp/vista/7
cpu: intel: 1.4 GHz, amd: 1.2 GHz.
Ram: 256 MB
graphic card :64mb NVidia Geforce / ATI Radeon
download all 3 parts
open the part 1 and
Run the Just Cause full{XDS}.exe
mediafire password: MOHAMMEDSAQIB
Freedom Fighters PC Game Download Free


SYSTEM REQUIREMENTS
MINIMUM PC REQUIREMENTS
Windows XP/VISTA/7
1.0GHz Processor
512MB RAM
1.14 GB Hard Disk Space
32MB DirectX compatible nVidia GeForce or ATI Radeon Class Video Card with Hardware
DirectX compatible Sound Card
DirectX 8.1
mediafire password: MOHAMMEDSAQIB
Overspeed Street Racing PC Game Download Free


Minimum system requirements
OS: Windows XP/Vista/7
CPU: Intel Pentium III or an AMD Athlon
RAM: 256 MB
HDD: 1 GB Hard Drive Space
Graphics: DirectX 9.0c compatible 64MB hardware accelerated video card (ATI® Radeon™ 8500 or nVidia® GeForce™ 3\\Ti series)
DirectX: Version 9.0c
winrar password {ir-dl.com}
GTA San Andreas Full Game Download Free


Minimum System Requirements:
1GHz Pentuim III or AMD Athlon
256MB RAM
3.6 GB Hard Disk Space
64MB Video Card
DirectX 9 compatable sound & video drivers
Keyboard, mouse
676.7MB
Remove Facebook Timeline 100% working
Facebook recently rolled out the Facebook Timeline to all users. Unfortunately, it does not
have any option for users to disable it making several users angry about the fact.
Now there are several Greasemonkey scripts and User styles which will allow you to
disable the Facebook Timeline. However, most of them require you to perform several
actions before you can get back to your old profile. Also, the same solution won’t work for
all the browser. So, if you are looking for a simple solution to disable Facebook Timeline
with minimal efforts, here is what you can do.
Please note: This trick will only disable Facebook Timeline for yourself. It will not hide
your Facebook Timeline from your friends and they will still be able to view it.
The Easiest Solution – Use Internet Explorer 7. Facebook Timeline is not supported on
IE7 and probably won’t be in the future too. If you don’t want to browse your profile or
your friends profile with Facebook Timeline, just use Internet Explorer 7.
If you use browsers like Google Chrome, Firefox or Opera you can still mimic your
browser string as Internet Explorer 7 and fool Facebook into believing that you are using
IE7 thus disabling or removing the Facebook Timeline for you. You can use the following
add-on, extensions and tricks to fool Facebook.
For all purposes below, the user agent string for IE7 is given below:
Mozilla/4.0 (compatible; MSIE 7.0; Windows NT 6.0;)
Firefox Users – Install the User Agent Switcher add-on and follow the instructions given at
this link to add a new IE7 user agent to the add-on and then use the user agent while
browsing Facebook.
Google Chrome Users – Create a new shortcut for Google Chrome and name it Facebook
or something. Once you have done that, edit the shortcut and add -user-agent="Mozilla/4.0
(compatible; MSIE 7.0; Windows NT 6.0;)" to it. Once you have done that, use the shortcut
while you are browsing Facebook and the timeline will be disabled. (Find Instructions for
creating and editing the Chrome shortcut)
Safari Users – Enable Develop mode in Safari by going to Preference -> Advanced and
selecting the check box next to "Show Develop menu in menu bar". Once you have done
that, select the "User Agent" sub-menu from the Develop menu and select "Internet
Explorer 7.0" from the available options.
Internet Explorer Users – If you are using IE7, you don’t need to do anything. If not, you
can make use of an IE Add-on called UA Pick. Instructions on changing your user-agent in
IE at this link.
Subscribe to:
Posts (Atom)